The interlaced embrace: energy and connection

Coming back from Buenos Aires to dance in the USA is always difficult. It's not the level of technique: in some cases, that is comparable with the dancers in Argentina. Why are dancers here different? One Argentine teacher told me that he was glad HE didn't have to teach North Americans tango every day: "They don't like touching each other!"

To me, it's not the physical touching that is lacking, but the emotional connection. Most dancers I dance with in Buenos Aires are more open. I can feel their energy open up to me, rather than block my energy. It is rare to feel that with dancers I don't know in the USA, and sometimes even with folks I know well.

I think this might be true for North America, rather than only for dancing tango. Dancing last night (West Coast Swing), I could feel my partners going through the motions, but not DANCING with me. One man kept putting my hands on his body and gyrating, but never connected in energy: it was a solo act! In fact, I was struck by the connection that was established with one dancer from Los Angeles (Latino), because all the other dancers--with the exception of my sweetie--did not connect.

There is a social component in what I experience as the connection in Buenos Aires. There, I have discussions about relationships, work, politics, love--in between dances in a tanda. In some cases, we started up conversations from the year before and continued them! When the dancing is REALLY good, we tend to talk about how good the dancing and connection feels, and often discuss the orchestra or the singer and how that is working to our advantage in the tanda. I don't experience that very much in the USA, except with established friends; and then we shy away from deep conversations, as if that would interfere with the dancing.

Is it more accepted to open to another person emotionally outside of white American culture (most of the dancers here would fit in that category). The Argentines I spoke with certainly think so, but there are cultural sterotypes about North Americans there, so perhaps that is not a valid observation.

What I try to accomplish in my teaching tango, is to establish a deep, interlaced embrace that allows for movement for both people, and allows for maximum balance and comfort. I think that aids in allowing emotional and energetic connection. That is one reason I've moved away from the square, stuck-to-your-sternum embrace I was taught years ago: if I am struggling for balance, how can I relax enough to allow a real connection to happen? When your body relaxes, your center relaxes, and you can allow energy flow to form a unified couple. It will take a bit more work to get our North American comfort zones small enough to let vulnerability in enough to really connect with others.

What do you think will help us open up to our partners and let our vulnerability out to play?


New Monday night sessions start 2/27


Both the Body Dynamics class and the Advanced class start new sessions the Monday after Valentango. There is NO CLASS 2/20: we are all too tired to learn after a festival :-)

7 PM: Body Dynamics

This class focuses on learning stellar technique to add more ENERGY and feeling into your dance. My style is body-based, working towards efficient use of the core to reduce wear and tear on the rest of the body. In each session, we look at how the body is built to move, and then work on using it the right way in tango.

This session, we will be preparing the body to move off-axis for colgadas, volcadas, etc. We will focus on using the core, the stretch of the body and leg strength (protecting the back), and also on freeing up a leg to combine boleos, etc., with these moves.

Also, we will work on being able to dance beautifully in small spaces.  Dancing small is hard to do with power and energy, but it is possible!

Designed for intermediate and advanced dancers, or beginners with dance background.

8 PM: Advanced class

Come challenge yourself!  Make your dance flow better; add sensuousness, balance, connection, musicality, adornos--take it to the next level! 

This session, the advanced class will focus on appropriate-for-the-social-dance-floor colgadas, volcadas, single axis turns, and playing with the axis. Each week, we will do a new combination, concentrating on dynamics, musicality and connection.

For dancers with at least three years tango experience, or instructor's permission. No partner necessary. You may work with a partner you bring to class, or trade partners.

$60/6 week session for one class. Special: sign up for both for $90! Drop in is $12/class.

Next classes start next week (and yes, there is class this week!)

Thursday classes start again on January 5th:

6 PM Beginner's Mind Practica:
Our practica is friendly, with no feedback unless you want it. If you are a beginner, I can introduce to other folks, answer questions, dance with you, etc. If you are not a beginner, I invite you to either come practice for yourself, or come and dance with beginners to give back to the community. Remember how nice some people were when you started? Be one of those nice I-dance-with-beginner types ;-) The practica is by donation.

7 PM Top Ten Moves:
Ten fundamental moves in ten weeks. In Argentina, many people only know this many (or fewer!) moves, but they do them REALLY well. This class is for beginners to learn the basics AND for more advanced dancers to polish those moves and build musicality and navigational skills (for the followers, this is the time to practice making each step exquisite). This is also a perfect opportunity if you already know one role, and want to learn the other. $80 for 10 weeks, or $12 drop in.

8 PM Musicality and the Next Ten Moves:
This session, we will focus moves that are sweet in both tango and vals (since we just did milonga last session). This class is for intermediates and advanced intermediate dancers. For each new move, we will put it into the dance, connect it to what you already know, and make it work on the dance floor. For followers, we will practice adornos (ornaments) and ways to make feet beautiful. Musically, we will work on putting moves together to make you partner drop at your feet with the beauty of your dance :-) $80 for 10 weeks, or $12 drop in.

There will also be Monday classes, which will be a six-week session; more to follow!

Beginning Argentine tango can be fun: basic building blocks and improvisation II

Learning Argentine tango has to be fun, or students will give up before they even taste the dance. There is a belief that the dance is hard to learn; it takes time to get good, but I can teach the fundamental ideas in an hour or two, and survival skills in about ten hours of class. I've been dancing tango since 1995, and I still am working on making my dance better. My point is: the individual chooses what level of tango they wish to reach; my job as the teacher is make that wish become reality.

I try to make every class have elements of fun, even if we are working hard on technique. There are at least ten minutes of each hour class that deal with pure play, fun and connecting with other people. After all, what do we want for our tango community? I want folks who are fun, who like to play and experiment, who pay attention to their surroundings and the people around them; joyous, kind folk who I want to dance with!

Yes, of course I want to train dancers who are the best in the world, with perfect technique, but maybe not everyone wants to be that dancer; private lessons are the place to do that deep training.

Back to group lessons and teaching beginners to have fun with tango. This is Part Two of this series. You can read Part One before or after this; there will be at least a Part Three, and perhaps more later on.

Pauses and adornos

One of the hardest things for new dancers to do, is to incorporate pauses into the dance. I start work on this the first day of class by providing a REASON to pause: adornos (ornaments)! Until dancers know the music well, there is a tendency to step on every beat, making a very monotone, flat-line kind of dance. Adding adornos in gives the dancers a chance to feel how pauses enrich the dance; it also makes folks feel like they are "dancing"--very important if you want them to head out to the dance floor with confidence.

It takes new followers at least a few seconds to realize that the couple has really paused. Then, there are the seconds devoted to thinking, "Hey! I could adorn here!" After that, time is needed to decide which kind of adorno to do. Only then does the dancer start to actually adorn (the time is shorter for the leader, as that person KNOWS the couple is going to pause).

Unfortunately, most leaders tend to pause for very short amounts of time. By the time the follower figures out there is space/time for adornos, the leader has already begun to move. So, how can beginning followers get practice doing adornos?

On the first day of class, I only show one adorno. That way, the time devoted to choosing an adorno is eliminated. I have everyone stand on one foot and trace their name, in cursive script, on the floor. I encourage them to think that they are leaving a deep mark in sand so that the leg is relaxed and heavy on the floor; this better approximates adorno technique that they will learn later. This also allows all dancers to stop worrying if they are performing the adorno correctly: they ALL know how to write their name (OK, with the hand ;-)). This way, they are able to add an element of personal style to their tango immediately, and a bit of PLAY, which makes everyone smile and keep dancing.

Energy and connection

This is the CENTRAL idea in tango, not a nice thing to add in after you know where your feet are moving. In fact, the steps can emanate from a strong flow of energy--some people never actually learn many steps, but tune into the partner and just dance (this is more successful for following, but it also works for leading).

I build energy exercises into at least every other class, to make sure that students have tools to use to connect with their own body, their partner, and the space in the room.

Self: Axis and breath exercise

Most of my energy exercises are done with the eyes closed, as I find that helps most dancers imagine how energy moves without getting distracted. For people who struggle with balance, don't require them to close their eyes.

Imagine that you have a hollow body, and can breathe up from the floor, through your legs, hips and torso, into your lungs, and then exhale out the top of your head, like a whale spout. Focus on the open cylinder of your body, and fill it with breath. Each exhale, even if you can't feel the energy follow this path, imagine it moving up your body, into your lungs, and out the top of your head.

Now, imagine the path reverse: breathing in the top of your head, expanding your lungs, and exhaling through your feet, as if you are pushing a magnet away from the underside of the floor with your energy (this is an image Oscar Mandagaran taught me, ten years ago).

Feel how the ENERGY of your body, and the BREATH, can be a column straight up from the floor, even though your body has curves and bends and joints. That continuity of energy and breath helps keep you grounded and contributes to your balance while you dance.

Partner: Force field exercise

This exercise usually yields the most immediate results of any of my energy exercises. For many dancers, close embrace tango is scary because "there's not enough room for my feet!" Each person is so aware of their own axis and body, that they forget to connect to the partner with their ENTIRE body.

Now, obviously, it is impossible to touch from head to toe while dancing. However, it is necessary to connect with energy from head to toe; this exercise facilitates that.

Pick your favorite color (i.e., red), or energy source (i.e., electricity), or element (i.e., water, fire) or implement (i.e. laser), and direct it THROUGH your partner, to the opposite wall. I personally like red, laser-beam-like fire; others like blue water, gold bubbles, purple lightening, etc. 

I add this on after the axis exercise. Have dancers face another dancer, close enough for their personal space to touch, but not actually touching. Leave at least 6 inches to a foot between the couple. Close your eyes, unclench your hands, relax your feet and knees (you may need to repeat these instructions during the exercise, as folks tense up sometimes).

Now, every time you exhale, send the [red laser fire] energy THROUGH your partner, to the opposite wall. As the dancers breath, I gradually add additional points to send energy through, until the entire couple is a person-shaped force field directed at and through the partner:

  • toes (add one thing every 2-4 breaths)
  • knees ("Toes, knees.")
  • hips ("Toes, knees, hips." etc.)
  • belly button (to make them laugh/relax)
  • ribcage
  • neck
  • head
  • whole body

Watch the group, and see which points of focus improve dancers' connections, and which make them revert to old habits. It will give you (and hopefully them) insight into what parts of the body need more/less energy to help balance and connection work best. I've found that often "Toes!" helps 3/4 of the followers: instead of trying to escape from the leader's feet, keeping the energy TOWARDS the leader, helps the follower avoid being stepped on, and is key to many followers improving their balance.

When all the body has been engaged, I do a second part of this exercise (sometimes, I stop here, and do the second part the next time we do the exercise). Without opening the eyes, move towards your partner until you are touching. Make an embrace (practice or actual, depending on level of class). Keep doing the force field exercise, but on each exhale, MOVE somewhere in space (one step). Inhale. Do it again. Everyone is moving slow motion, so there are few collisions. Encourage folks to do this with their eyes closed, rather than to cheat: it changes how they use their force field, extending it AROUND the couple like a bumper!

Group: Solo-couple exercise

Getting into the flow of the dance requires the couple to tune into the energy of the entire room. If that doesn't happen, collisions reduce the enjoyment that comes with tuning into the partner. To facilitate that, I teach a game I call solo-couple.

First, all the dancers move around the room IN ANY DIRECTION, swirling around with the music and tuning into the physical space. If someone is in the way, instead of stopping or changing direction, the dancer will simply turn in place until there is a space to move to. Arms and bodies need to stay relaxed in case of collision (I tell students to exhale if hit, so the impact will be reduced). I encourage dancers to actually LOOK at each other :-)

When I yell COUPLE! everyone grabs the nearest other dancer WITHOUT STOPPING, and keeps moving in space, turning in place when there is no room, and otherwise moving to new spaces. When someone stops, or the traffic starts to get congested, I yell SOLO, and we go back to the first part.

Although in real life, tango does not float around in space without pauses, I have found this exercise very helpful for new dancers. The ongoing nature of the rules imposes moving without forethought, thus removing the analytical block a lot of new leaders have, to responding to the music and available space to make a dance. Also, once this exercise works, a dancer learns to tune into the movement through space of the group as a whole, making it easier to navigate comfortably as more complex issues arise (such as a couple in front pausing for a long time).

Naughty Toddler

Naughty Toddler is my favorite game right now (since I thought of it about six years ago!). It offers benefits to both leaders and followers that allow a complete beginner to get out on the dance floor, have fun, and not hurt anyone else ;-)

Just as it is difficult for the average adult to convince a toddler NOT to do something, but easy to divert their attention to another activity, it is easy for a leader to divert the follower's energy into more positive, tango-like activity, rather than to wrestle the follower into submission. Usually, a follower's mistakes come from not dancing perfectly, rather than not paying attention, but the leader experiences those moments as being out of control. What if we use those moments to reassure the leader that, no matter how badly the dance goes, s/he can make a good/safe dance from the chaos?

Not only that, but a lot of

In Naughty Toddler, the person "following" is NOT following. That person can do anything s/he likes, whether it is to do adornos for the whole song, turns, ochos, walking; or even dancing badly on purpose--hanging on the leader, not waiting, being noodly or too tense, etc. I have NEVER met a dancer who didn't come to love this game; it's a good stress-reducer, too, if folks are frustrated about their dance.

The "leader" hangs on for dear life. I suggest holding firmly to the "follower's" shoulders, just in case of malfunction :-)

Traffic

It is of paramount importance to accustom new leaders to the reality of dancing with people in the way. I start this in my beginner's class with the traffic game. For beginners, I usually incorporate this game into solo-couple, or into the Tete exercise (see Part One). I pretend to be the "bad" dancer on the dance floor, staying in one place for too long, backing up into traffic, cutting across the dance floor randomly, etc. (this also helps beginners understand what NOT to do on the dance floor).

Next, I designate half or a third of the class to be "traffic" and obstruct the other dancers. If the room is too big and folks can escape, I have them use only part of the room.

As the space gets smaller or the amount of traffic increases, the dancers get better and better. This happens in every class. I think that the game helps new leaders turn off their brains and just dance as they are forced to make decisions based on other people's decisions/behavior.

Another variation of this game, is to do the same thing, but with a ring of chairs in the middle ("the doughnut") that prevents dancers from floating across the center of the dance space.

New leaders emerge from this exercise with new confidence (as in Naughty Toddler) because they overcame obstacles and did well. New followers learn the importance of keeping their heels near the floor and staying on axis to allow the leader to deal with traffic; and trust the leaders more.

Alignment

This is the hard part of dancing: not the steps, but standing and moving efficiently.  I teach this along with the fun pieces, one or two ideas each class. In more advanced classes, I cover the same material again, with more drills, more explanation, etc. In beginning classes, I try to help dancers understand that this should feel easy/comfortable/less difficult than what they are doing. For many of us, this will feel "strange" but not wrong.

Nitty gritty about body alignment (skip this if you are just going for the meat; read it if you really plan to get good at tango):

  1. The bones of the body hold the body up, with minimal help from the muscles. That leaves the muscles to dance/play.
  2. The connection with the floor (hopefully, your feet!) is grounded, relaxed and balanced. Half the body's weight is over the ball of the foot, and half over the heel. The toes are released, not gripped for balance or fear ;-)
  3. The ankles are relaxed!
  4. The knees are relaxed and slightly flexed. They are used as part of the "spring" from the ground, up through the pelvis, that allows you to move in a balanced way.
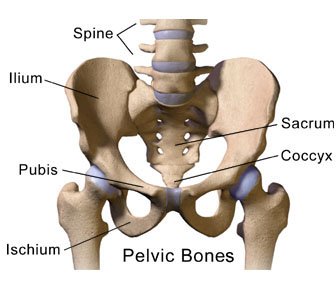
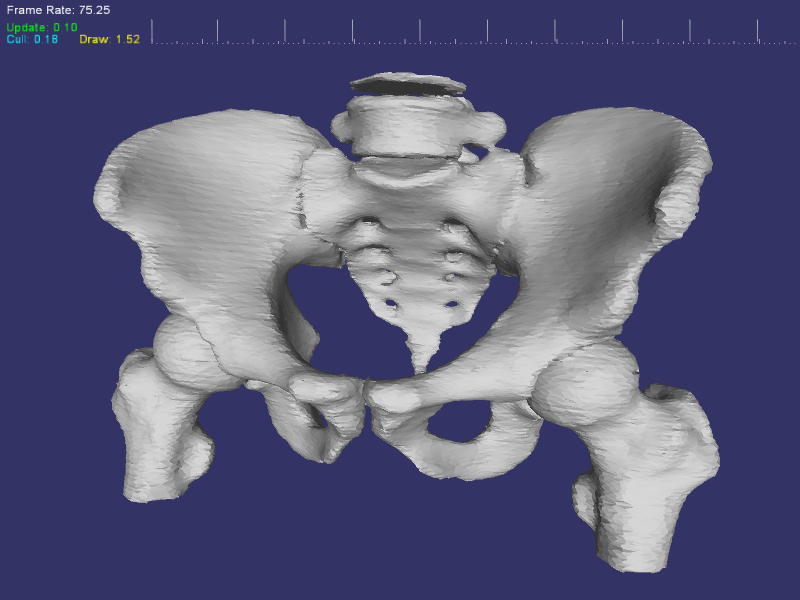
  5. The hips are back so that the head of the femur is tucked into the pelvis. This allows the bones to do the work, rather than the ligaments and muscles across the front of the hip joint. In other words, the opposite of the North American slouch. This is the hardest part of basic alignment to learn as a laidback, slouching "yankee" (what norte americanos are called in Buenos Aires by guys like Tete).
  6. The lower back is elongated and soft: the hips are moved back at the hip joint, NOT by curving the lower back.
  7. The whole spine is elongated, so that the solar plexus opens towards the partner, creating an energetic, lively connection.
  8. The head is relaxed, balanced on the spine.

Remember, keep the fun factor up, along with the time for each person to really DANCE, and you will enjoy your classes more, along with your students.

New classes start this week! Argentine tango and more . . .

All classes are six weeks long. All start THIS week, but are drop-in.

Couple Dance 101

Would you like to ease into couple dancing? This class will teach you how to: lead/follow, identify the music, move with a partner, and help you "survive" on the dance floor.  It will give you a taste of several dances--salsa, swing, rumba, waltz, tango, etc.--to help you decide what dance(s) are for you. Come learn to feel comfortable dancing with partners!

  • Tuesdays 7:30-8:30
  • Krakow Cafe, 3990 N. Interstate (they have coffee, food and beer!)
  • No experience needed, no partner necessary
  • $60/6 wks, $12 drop-in (summer special: $100/couple)

Milonga traspie and Tango vals: musicality, flow and improvisation

This class is designed for intermediate and advanced dancers who want to improve their milonga and vals. We will do new patterns each week, but the main focus of the class is to make your dances feel magical to your partners through improved musicality, technique and style.

  • Wednesdays 8:15-9:15 (and then let's walk over to Norse Hall to practice!)
  • Om Studio, 14 NE 10th (between Burnside and Couch)
  • No partner needed
  • $60/6 wks or $12 drop-in
  • Warm up for Oscar Mandagaran and Georgina Vargas' visit the last week in August! They will be teaching vals and milonga classes, so get ready!

Tango Fundamentals: connection, energy and play

This class is designed for beginning students and for continuing students who want to focus on the fundamentals of Argentine tango. We will do new patterns each week, but the main focus of the class is to make your body into a tango-dancing piece of poetry! Breath, posture, balance, axis--attention to the fundamentals brings a connection to the music and to your partner that raise your dance above the ordinary. We'll play tango games to make your dance fun and improvisatory, right from the first hour.

  • Thursdays, 6-7 PM
  • Om Studio, 14 NE 10th (between Burnside and Couch)
  • No partner needed
  • $60/6 wks or $12 drop-in
  • Warm up for Oscar Mandagaran and Georgina Vargas' visit the last week in August! They will be teaching classes for all levels, including the basics; get ready!

Continuing Tango: creating magic through dance

This class is designed for continuing intermediate and advanced intermediate students who want to build a powerful, sensuous and elegant Argentine tango. We will do new patterns each week, but the main focus of the class is to find the magic of YOUR dance. Each week, you'll walk out of class with more confidence and beauty in your tango, ready to spread YOUR magic on the dance floor.

  • Thursdays, 7-8 PM
  • Om Studio, 14 NE 10th (between Burnside and Couch)
  • No partner needed
  • $60/6 wks or $12 drop-in
  • Warm up for Oscar Mandagaran and Georgina Vargas' visit the last week in August! They will be teaching classes on lead and follow technique for intermediate and advanced dancers, so get ready!

Questions?  Call me at 541.914.4812 and I'll see you in class!

The duende of tango

I think of "duende" as the "passion" or "soul" of something.  Merriam-Webster defines it as "the power to attract through personal magnetism and charm."

What is it that attracts people to tango, and then holds them in tango's embrace?

I don't think it's the steps of tango, or the music, although I am hooked on both myself. I think it is tango's demand that both the leader and the follower must interact with another person's energy and spirit, in order to dance well. To dance tango, you need to take an emotional risk and open yourself to another soul.

Beginner's mind

What made me think of this was a joyous, laughing beginner who tore up the floor last night at my lesson.   When I fired up my Naughty Toddler exercise, he flew around the dance floor with a more experienced follower, and led her in moves that I KNOW he does not know. He put his entire heart and soul into that dance, and it was breathtaking. 

Now, tango is not a solo dance, so you need a partner willing to risk all as well. Last night, a quiet, sweet follower turned up the volume, met this beginner's energy, and did the best dance I've ever seen her do in a year of dancing. She looked phenomenal; she took risks I've never seen her take, and it paid off.

It looked FUN! It had passion, it had groove, it had soul; for a moment, the duende of tango peeped out.

Maintaining beginner's mind

All of the tango beginners who showed up quickly got the idea that the shared energy counted more than perfection of steps. As we explored, the more shy dancers started to play, smile, risk more, and began to dance with energy, with spirit, with soul.

More experienced tango dancers were less sure. I saw the skeptical looks exchanged by the "experienced" dancers (something along the lines of "I think she must be nuts" as far as I can read facial expressions). A teacher is telling us that it doesn't matter how well we do the steps?!?!

Some of those dancers did not walk on the dance floor with an open mind. When I left, they were practicing dance moves--without any spark of connection. Well, you can't change anyone's mind except your own :-)

One more experienced dancer took the challenge. Over the course of a few dances, I watched tentatively try out "misbehaving" as a follower. She started to smile. Her dance improved, but it was not easy for her. I honor her for daring to step out of her comfort zone.

My job as a teacher

I used to think that teaching perfection in each step was my primary job as a teacher. After twenty-four years of teaching dance, I no longer believe that. In the past two or three years, I have come to realize that I needed to relearn how to teach, in order to serve my students better.

My job is to release joy, confidence and pleasure into the world; to facilitate personal fulfillment.  For some people, that does mean reaching perfection in a dance style, and I am happy to share my expertise (and my anal retentive nature!).

However, for most of my students, I find that their goal is NOT perfection. They have different goals: find a boy/girlfriend; spend time in our unconnected lives to touch other humans; to express themselves to music; to build balance and flexibility in order to dance into old age; etc. For all of them, they seek those magical moments during a song where two energies meet and two souls touch. Perfect dancing should be perfect connection. Tango entices because it offers an opportunity to reach that perfect connection every dance.

That is what I try to teach. Ask me about the Tiger Growling exercise sometime! Or, come to the Eclectic Dance at Norse Hall on Saturday night (lesson 7:30) and experience it for yourself!

Creating your tango on the fly: paradas, drags and stepovers

One of the complaints I hear from intermediate dancers is that they don't know how to combine the moves they learn with their established habits on the dance floor. My preferred approach to new material is to integrate new moves immediately into the structure that dancers already use; and to understand material as a matrix of opportunities that suggest themselves while dancing.

One example of this: While turning, the follower takes a back cross step every four steps. What can you do with this step? Let's look at a few possibilities that are almost identical in setup, but differ in terms of which side of the follower's foot connects with the leader's foot; which foot the leader uses; and what the music says to do.

Back parada (stop) and pasada (stepover)

A parada (see most recent post) led on the follower's back cross step, or back parada, places the leader's foot in the way, blocking the next side step in the same direction of the turn. For example, if right turn is happening, the follower's left foot is blocked on the outside edge with the inside edge of the leader's right foot (to keep us all sane, I will only suggest one possibility here for the moment).

Two possibilities:

  1. Reverse the follower so that s/he steps FORWARD over your foot (so, a back parada and then a front pasada, or stepover).
  2. Do a sandwichito (little sandwich), bringing the leader's other foot up so that the leader's heels touch around the front of the follower's foot; then step back with the foot that originally stopped the follower; let the follower collect the heels around the front of your foot, and then step over (the version I described in the last post).

A drag (barrida or "sweep" or arrastre or "drag") and pasada

If you set up EXACTLY the same way as mentioned above, BUT place your foot on the other side (instep) of the follower, you can then perform a drag and stepover.

Let's say that we are turning to the right, and stopping the follower when the follower's left foot is near the leader and the right foot has done a back cross and is touching the floor.

Just like a parada, the drag is an illusion: it is led with the torso, and the leg drag simply adds another flavor to what is simply a side/open step of a turn for the follower. So, as soon as the leader's foot is in place, the leader's torso turns (here, clockwise, or to the right), and the leg accompanies that movement, so that the follower, the leader, and both legs arrive at the next point, at the same time.

This is a nice moment to incorporate the pasada, or stepover, perhaps with a pause for adornment before it.

Again, two possibilities:

  1. Drag with the foot towards which you are turning. In this example, use the right foot to drag. Your hips face the follower to make the leg drag easier. Then, the leader's torso twists to the right/clockwise, as do the hips and legs.  The leader ends up with hips and torso facing the follower (don't forget, keep your feet in a V, or you will fall over!)  The leader's right leg guides the follower to step immediately in front of the leader's new facing, and step over. 
  2. Drag with the opposite foot (i.e., to the right with the left foot). For this move, the leader must align the hips and feet facing the follower's NEXT step, while leaving the torso facing the follower's present position. Then, twist the torso to align with the hips and feet; and lead a stepover. This move is easier to keep one's balance, but harder to execute a pretty drag, as there is a tendency to push the follower's foot, instead of accompanying it with the leader's foot.

# 1 is easier to lead in close embrace (IMHO), while #2 is easier in open embrace; but don't limit yourself! Try both, to both sides, to see which one(s) you like, and use those.

This week in class, we'll cover some more ideas that are built off of back cross steps in the turn, and we'll also look at moves from the follower's side step. More drags, more pasadas, maybe even some ganchos! We'll see how far we get.

Basic tango pointers: notes from my Tango Fundamentals class

This session of Tango Fundamentals, we've been working on building balance, connection and energy with our partners.  We've also worked on starting and exiting turns in different ways, as well as spiffing up our traveling back ochos. Here's what we've covered in the first three weeks of class:

Balance, connection and energy

  1. Energy flow drill: This drill teaches you to be aware of the energy and motion of everyone dancing in the room. As a good leader, you must know this in order to successfully and safely lead the follower around the dance floor. As a follower, being aware of this helps you be a responsible dancer (i.e. limiting your boleo height, restraining big adornos in a crowd, etc.). In the energy flow drill, we all move through the available space (in any direction), and try to remain constantly in motion. If someone is in the way, we turn, rather than pausing. If there is space somewhere else in the room, we go where there is space. In "real life" tango situations, there are cultural rules that prevent us from having this much freedom: we dance counter-clockwise in the room; we don't pass the couple in front of us; we maintain "lanes" of movement. However, by remaining aware of the space around us, and how the entire room of people is moving, we can plan ahead better and avoid accidents.
  2. Solo-couple drill: This game teaches you to get connected to your partner quickly. Once the energy flow of the room is working, we move through the space in couples. In Solo-Couple, the teacher calls "Solo!" and everyone does the energy flow drill. When the teacher calls "Couple!" everyone grabs the nearest dancer, and WITHOUT STOPPING, continues to dance around the room. Again, in "real life" tango, there is time to cabeceo, approach the dance floor, take your space, embrace your partner, and then start dancing. However, in festival situations, there is no space to spend time on all of this, and you need to get on the floor, connect, and start dancing within about 30 seconds if you don't want to be run over! This drill gets the dancers to tune in to their surroundings in order to successfully survive joining a tanda in full swing.
  3. Energy bunnies and energy vampires: This game helps you maintain your energy on the dance floor throughout the evening. I don't remember which of my students at the University of Oregon named this game/drill, but I've kept the names because everyone laughs when we do this! Obviously, this is an energy game: take energy from the people around you if you are tired, or give energy to the room/your partner if you are energized. On each dance floor, there is a level of energy present. Sometimes, the room's energy gives the dancers energy; sometimes not. In this game, we move through space in any direction, and make sound effects/motions to send energy to everyone we pass. Then, we move around, taking energy away (little sucking noises and vampire faces seem to be the favorites). I have found that everyone in the room has a higher energy level after this game, and use it in class to wake folks up; on the dance floor, I use this energy-building skill to be able to keep dancing, hour after hour (I don't make the noises and faces then!).
  4. Naughty Toddler: This game helps the follower give energy to the leader, and teaches the leader to use the energy as a way to improvise on the dance floor. Just as it is easier to divert a toddler than to stop unwanted behavior, it is easier to redirect a follower than to wrestle with them. The follower does not follow in this game: s/he does whatever moves come to mind, tango or non-tango. The leader holds on with both hands, and tries to use the follower's energy to get around the dance floor without collisions. As the leader figures out how to steer the "toddler" this game becomes "my chi is bigger than your chi" as the leader reads the energy and PREVENTS the "toddler" from misbehaving by leading clearly with the energy present in the dance: by the end of the game, the leader should feel mostly in control AND the follower should have felt led, but not wrestled.
  5. Posture work: floor, sitting, standing. We start lying on the floor, feet flat on floor and knees up (in skirts, face a non-mirrored wall). Feel how relaxed your spine and hips are! Feel how your spinal alignment works when not fighting gravity. Now, sit up (cross-legged on floor, or in a chair if you lack flexibility). Try to recreate the same alignment as on the ground. Third, stand up and again recreate the floor alignment, adding the complexity of adjusting your pelvis for standing. The more you do these three steps, the more your alignment will remain relaxed AND in position when you move in tango.
  6. Breath work: axis and force field. I do the axis drill after completing the postural work. Standing in place, alone, on axis, close your eyes. Breathe and imagine the air can come up from below the floor, up through your body, to your lungs. When you exhale, send the breath back down through your feet, as if you are pushing a magnet away beneath the floor. After a few breaths, change the exhale to go up through the top of your head and up to the ceiling. Third, exhale and inhale with the same amount of energy and breath coming in from the feet and head; and exhaling 50-50 as well. In the force field drill, face partner close enough to be in their personal space, but not touching. Do the axis drill, but when you exhale, also send energy/light/electricty/your favorite color/etc. straight out your toes, through your partner, and to the wall beyond them. After a few breaths, expand that to a rectangle of energy from the toes and knees; expand to the hips; add up to the belly button; now up to the ribcage; next, include the shoulder blades and collar bones; finally, the entire body sends a rectangular force field through the partner, to the wall beyond. When this is in place, move in to an embrace and dance with your partner, eyes closed. On each exhale, move. On each inhale, pause. Keep the force field working.
  7. Energy work: directing movement from the solar plexus. We moved across the floor, met a partner, and kept sending our energy across the room, slightly up and through the partner (there were interesting interpretations of this, but we'll leave that for later ;-)). In order for you to NEVER step on your partner's feet, you need to send your energy forward into their body. The solar plexus should never point down, or your partner's feet will suddenly be in your way. Followers: remember to send the energy TOWARDS the leader, rather than "escaping" away; it will save your toes!

Steps

Turns: Last session, we concentrated on turning after reaching the cross (la cruzada).  This time, we expanded our ways of getting into a turn.

  • right (clockwise, CW) after side step (follower's first step of the turn is a front or back cross step with the right foot)
  • left (counter-clockwise, CCW) after side step (follower's first step of the turn is a front or back cross step with the left foot)
  • right (CW) after rock step (follower's first step of the turn is a front cross step with the right, across the leader's body)
  • left (CCW) after rock step (follower's first step is a front cross step with the left, across the leader's body)
  • rock step and left (CCW) turn (follower's first step is an open step around the leader with the right foot)--this is NOT the same as starting the turn FROM the rock step. Here, the leader leads a rock step so that the follower's RIGHT foot is free; thus the turn starts with an open step for the follower.
  • at the cross (@X), right (CW) or left (CCW) turn (follower's first step is either a front cross or an open step, with the right foot.

Traveling back ochos: There are many ways to do this step.  I advocate a smooth, elegant, sexy version that allows the follower to pivot slightly and adjust in the hips, while the leader basically walks forward.

  • Get into crossed system: I prefer stepping forward-together-forward, rather than side-together-forward here. I feel that the follower gets a clearer signal if the first step is line-of-dance (LOD), rather than sideways.
  • Leader walks in a SLIGHTLY wider stance, but keeping the V of the feet facing LOD and the hips facing LOD. This is not a time to start waddling ;-)
  • The leader's chest moves in a natural, cross-body motion in order to walk. No more motion is needed here. If you tend to be rigid in your torso, you may have to work on this rotation around your spine in order to make your walk more elegant and easier on your body.
  • The follower's body also uses cross-body motion in order to walk backwards. Because you are now in crossed system, the follower's free leg NATURALLY crosses behind the other leg. The hips adjust and pivots slightly, as do the feet, to make this look pretty and to remove stress on the spine. Take care not to overturn in this move (in open embrace, a bit more rotation can be used for a more zig-zag style of ocho, but I personally prefer this one.
  • To exit, walk to the cross in crossed system, resolving at the cross. Alternatively, you can exit by turning CW or CCW into a turn. I don't usually lead back into parallel walks to exit because it isn't very elegant. Also, when do you ever have space to walk traveling back ochos and then keep walking? :-)

This week, we'll be adding walking to the outside track, in parallel and crossed systems, and playing with the "forgotten" side of tango.  See you in class!

Compact combinations with front boleos

Last night in intermediate tango class, we worked on two close embrace (or open if you like) combinations that included front boleos. I enjoy teaching moves that I lead, but that I don't see out there on the dance floor very often.

This was a continuation of some ideas we worked on the week before, with the added request from a leader to learn compact moves that would keep him interested, but help him avoid crashing into others.

Front boleo at the cross

What I like about this boleo is that you can lead it on a crowded dance floor, with almost no preparation, on any intermediate or advanced dancer who can follow a boleo. It can be a quick move, or almost slow motion, allowing the follower to play with the exit step, adding an adorno, or just caressing her way through the leg motion. Mmmm! This is a move for the follower, not to show off to your buddies watching: it's small and delicious.

  • For this move, you need to have your cross (cruzada) dialed in. If you arrive at the cross with no energy, or off balance, this is NOT the time to lead a boleo.
  • As the follower arrives at the cruzada, and switches weight onto the left foot, the right leg is free and available for a boleo.
  • The leader rotates slightly to the left to free the follower's right leg, and then keeps rotating to the left to create a "con" boleo (both people rotating the same direction, or counter-clockwise here). It is very important for the leader to keep the hips facing forward, or this step becomes a left turn, not a rotation in place for the follower.
  • As the leaders noticed in class, the key element is timing, not force. This is a rebound, not a throw and catch sequence ;-) You need to create rebound in your torso by keeping the hips forward, and then give the follower's leg time to finish the rebound AFTER you until both of you are ready to exit the move.
  • The follower needs to release the free leg (right) at the hip joint while standing tall on the support leg (left). Make sure that you pivot your foot on the floor enough to allow your hips to turn through the space around your axis; don't start the boleo too soon, or you will kick the leader. Keep your heels together in your "V" until the leg has to release, creating the boleo.
  • After the release of the boleo, the follower's body unwinds, or rebounds, back to neutral to allow a walking exit from the boleo.

Front boleo after the walkaround turn

Most intermediate dancers already know how to do traveling back ochos. Most also have good skills at leading turns. This move combines those elements with a spiffy front boleo that is used as a change in direction in the middle of the sequence.

Leader's information:

  • Here, having smooth traveling back ochos sets up for a tight turn, which leads to the boleo.
  • Make sure your traveling back ochos go DOWN the room, not from side to side, leaders. In class, we polished this move to make it more enjoyable for the follower.
  • After either .5 or 1.5 ochos, the leader is on the left foot traveling line-of-dance (LOD). Twist the torso (but not the hips) to the right (clockwise) to get the follower turning around you with a "back cross, open step, front cross" turn.
  • As soon as they vacate the space where they were standing before the turn, step there and rotate in place for the follower's turn. This is a sacada in a way, as you are replacing (or displacing) the follower in space. However, you step around the follower's foot, not through the open space between her feet, so it looks different.
  • As the follower lands on the front cross step (the follower's right foot), rotate as if to make a front ocho BUT don't allow the follower to step forward: keep them on balance on the right foot. Overrotate until the follower's left leg does the boleo, and rebound back.
  • At this point, the ending we learned is my favorite way to use this step on the dance floor. If done correctly, you end up facing LOD, ready to walk down the floor. As the follower unwinds from the front boleo, have them do a left turn (back cross, open step, front cross) around the leader until the leader faces LOD, and walk.

Follower's information:

  • On your traveling back ochos, make sure that you use your hips to do most of the rotation, rather than swinging your legs for momentum. This will make it easier to overturn into the right turn.
  • When the leader and you are both on left feet, the leader will have you overturn to his/her right. This gives an overturned back step to begin a three step turn: back cross with right, open step with left, forward cross step with right.
  • As you arrive on the right foot, you should feel an impetus to pivot, as you would for a front ocho, but without being sent forward into a step. The pivot should be extreme, so that your left leg has to release around your support leg (right) for a front boleo.
  • Let the boleo rebound into a back cross step with the left, open with the right, forward cross step with the left, to end up facing reverse LOD, ready to walk down the floor.
  • Remember that your boleo is a response to the leader's torso rebound. Just like a whip handle and whip tip, your leg trails the leader's initial twist, so you will finish a fraction of a moment behind the leader's move. They should wait for that unwind, and use your momentum to start your turn to the leader's left.
  • Hip motion: we worked a bit on the proper hip placement in a pivot, so that the leg swings more freely. The knees contact each other (like Pringle potato chips), fitting one in front of the other, and releasing back for the rebound. Remember that the boleo energy comes from the hip pivot and leg release, not from winding up and swinging.
  • After the front boleo, make sure that your free foot passes against the heel of your support leg, to avoid kicking the leader :-)

Those of you were in class, try these moves out, and let me know if I forgot to include something that you need to help remember the combos. I've been doing these for so many years that sometimes I forget to explain something when I write it down!

Arm and shoulder structure: improving your tango embrace

If I am touching someone else I will be able to feel theirtextures, the forces moving within them, instead of just the pressure of my own tight-held fingers indenting their skin. Something is exchanged through our nerve endings and we are both moved by each other. Each one of us experiences a slight re-arrangement of all our cells. (Dowd, p. 45)

Yet another great Irene Dowd article from the book Taking Root to Fly, "The Upper Extremity" discusses the anatomy of the shoulder girdle and arms, provides a good visualization exercise that I think will help in tango embrace (and any partner dancing) and ponders posture and perceived morality, which we'll also address.

First, let's look at how the shoulder girdle is constructed, how that requires us to move efficiently, and what that means in terms of the tango embrace and leading/following a move.

Arm and shoulder anatomy

The shoulder girdle is an incomplete bony ring that rests on top of the ribcage. There are four movable parts: two clavicles (collarbones) and two scapulae (shoulder blades). The only bony connection between the shoulder girdle and the rest of the body, is the joint between the collar bone and and the sternum (breastbone).

The arms attach to the shoulder blades with a ball-and-socket joint at the shoulder. This joint has the most mobility of any joint on the human skeleton. Because of that joint, and because the shoulder blade can move up and down through a large range of motion, your hands can reach anywhere in a three-foot range of the body.

Your elbows have a 180-degree mobility. At the wrist the two bones that make up your forearm can rotate around each other so that the hand surface can face any direction without changing the orientation of the body as a whole. The twenty-seven bones in each hand move around easily as well.

Balance, dynamism and energy

So, the good news: the human shoulder and arm have enormous mobility potential. The bad news: there are lots of little tiny pieces that need to be aligned in order to correctly create a good dance embrace!

Somewhere between extremes, there is a perfect alignment and balance that we can reach, although Dowd notes that it is "not easily achieved" (p. 40). One reason why it is not easily achieved, is that balance must have an element of energy in order to work. If the alignment is perfect, but not movable, then it cannot be used. Below, there is a visualization to practice, in order to find alignment AND energy.

A second reason why we find balance difficult to achieve, is that we don't typically use the entire range of motion that our arms can perform, and thus find it difficult to find middle ground. Most of us use the muscles for keeping our arms and hands in front or above us. Right now, I'm typing and sitting. I do many tasks that require my arms to be in front of me. When my son drags me onto the monkey bars at the playground, I realize how weak my muscles are for hanging or for pulling myself through space from rung to run. Likewise, my pushup muscles are pathetic.

How do we increase our mobility to find a balanced alignment? Relaxing the shoulders and letting them drape over our ribs will help with this mobility. Dowd says we need to ". . . give up all extraneous muscle tension" (p. 43), in order to find an energized, balanced alignment of the shoulder girdle. Try the visualization described below to help achieve that.

Moral judgments, personality traits, and movement

A third reason why balance is elusive is the moral judgments we have been taught to make about various movements through our cultural upbringing or family belief system. Dowd writes:

Since the potential range of motion of the upper extremity is tremendous, no one culture encourages the use of all this range in 'normal' daily activity. Therefore, the final step [towards balance] involves performing movements one may have never thought of before. Performing activities which are 'abnormal' may bring subtle censure from one's own internal, and perhaps uncompromising, moral judge. The censure may be in the form of feeling awkward or just uncomfortable with the unusual movements, or even a little sad or irritated. (Dowd, p. 41)

As humans, we use a lot of arm and hand movement when we communicate (hand waves, shoulders shrugging, arms folded across our bodies, etc.). We cannot move our upper extremities without expressing emotion or communicating information. We react to how we move, and so do other people.

If certain ways of holding the body or moving are not considered morally "right," we fight with our feelings towards that position. Dowd notes: "If one extreme is judged 'good' and the opposite 'bad' then one can hardly feel balanced halfway between these two. Instead one will keep edging towards the 'good' polarity (p. 41)."

Think about the shoulder element of "stand up straight!" that we see here in our culture. The military "upright" stance throws the shoulders back in an extreme position, squeezing the shoulder blades together, pushing the ribs out of alignment and tightening the body. However, this is taught as a "good" position. Conversely, relaxing the shoulders and back to the other extreme creates a slouchy position that is seen as "lazy" or "bad" in our culture. Most students I have taught tend towards the tight extreme and fight relaxing; not surprising in our "look busy" culture. It's a physical expression of our cultural teachings.

What does this say about people wanting a lot of arm motion but not chest motion? A lot of issues with the embrace have to do with how we feel we need to express ourselves to be heard. Moving arms more than balance allows: assuming that the other person is not listening, or that they won't understand us unless we "yell" with our arms. Rigid shoulders and arms: believing there is a "right position" that we can find and hold so we don't make mistakes.

I could be way out in left field here, but I think there are interesting tidbits about people and movement.

I am thinking especially about a student of mine who LOVES big movements. He doesn't like to be controlled any anyone; he enjoys expressing himself any way he wishes; he likes breaking rules. His arms go everywhere. Dancing with him is always fun, in the same way that rock climbing or carnival rides are fun: fear and excitement mixed; I never know what to expect. His belief system and dance style definitely match: no little tango rules are going to stop him!

My teachers have always told me to "Relax, Ely! Relax!" I am so dedicated to doing things 100% right, that I can't do them 100% right! I have had to learn to use less effort, find out how to stretch while relaxing (tight does not equal stretched!), in order to actually become aligned. My upbringing taught that your vocation should feel hard, like work, not relaxed and fun! Oy.

Visualization for aligning your shoulder girdle without extraneous tension from Dowd

Here is a visualization to improve energy flow, release muscles, and help find alignment and balance. It also aims to release the old teachings we hold in our bodies that no longer serve us because they impede balance.

1. Lie on the floor in a relaxed pose (feet flat on the floor, knees up, back relaxed along the floor, arms either relaxed next to you, resting on your body, or reaching up over your head to release on the floor).

2. Close your eyes.

3. As you breathe, light/energy/electricity/color/you choose, explodes out the solar plexus and then flows along a rib, continuing around to where the rib connects to your spine. Breath again and, each time you breathe, expand the energy circling your body to another rib, until you can see/feel the entire rib cage expanding and flowing like this. (Dowd suggests thinking of the rib as a "horizontal gaseous ring" like Saturn's rings).

4. Now, imagine that your shoulder blades can soften and melt away from your rib cage. Dowd suggests thinking of a "chinese fan with its handle at the base of my thorax [right above your lower back] and its furthermost tips arching open at each of my shoulder joints" (p. 44). I think of having wings like a butterfly, and folding them open, so that the outer edges of my shoulder blades release down and the outer edges of my collarbones do the same thing. The shoulders widen and relax away from the spine.

5. Think of each joint as a gateway that can open to the light. Each gateway widens as you let the feeling move through that joint or bone. When you breathe, light/energy/color flows from your chest cavity, out through the shoulder joint, down through the bones of the arm, through the elbow, through your forearm, through your wrist, through the bones of your hand, and out your palm and fingers. Let the energy release out into the ground.

6. Let the energy flow in through the soles of the feet, up through the foot bones, through the ankles, up to the knees, through the knee joint, up to your pelvis, through your pelvis, up to your spine. Then, repeat step 5 and 6 as many times as you like.

7. As your body releases your joints, you can find a new neutral position, free of old habits and old information about the "right" ways to hold or move the body. When you get up, try to bri ng the new feelings with you, releasing old judgments.

Ideas to bring onto the tango dance floor (or salsa, or swing or polka!) from this work:

If what comes to me from contact with another person seems undesirable to me at any time, I can simply allow it to continue its movement quickly and unimpeded out of me through the very same pathways from my body to earth that I opened wide during my passive visualization activity. (Dowd, p. 45)

Facing another living organism . . . is almost, but not quite, impossible to do with total neutrality and openness, without any use of previously-learned techniques or defensive contraction, (Dowd, p. 45)

If I am touching someone else I will be able to feel their textures, the forces moving within them, instead of just the pressure of my own tight-held fingers indenting their skin. Something is exchanged through our nerve endings and we are both moved by each other. Each one of us experiences a slight re-arrangement of all our cells. (Dowd, p. 45)


I am so grateful to Irene Dowd for writing these lovely articles. At twenty-five, in graduate school, I didn't completely understand what she was talking about (and wished she would be a bit more succinct). How wonderful to re-read them and find that I've been teaching this information for years, having forgotten from whence it came!

Finding your center: Irene Dowd's article on pelvic structure and alignment

You are now centering your pelvis in relation to the rest of your body, but it is not in a position. It is an ever dynamic balance that allows you your fullest possible range of movement with the least possible muscle work.” (p. 27, Taking Root to Fly)


The pelvis is a bowl, or a funnel or . . . what DOES it look like? Check out these images (and the other thousands on Google):

http://www.drugs.com/cg/images/en1291214.jpg

http://www.sandbox.de/osg/stl/pelvis.png


Irene Dowd’s article, Finding Your Center, looks at pelvic structure and finding balance/alignment while moving. Dowd describes the pelvis as “the hub of a wheel . . . the point around which the entire body weight balances equally above and below, and to all sides” (p. 20).

The rest of the body is connected from this center by muscles, and when the pelvis moves, the rest of the body moves through space along with it. There are three bones comprising the pelvic girdle: the sacrum, and two os innominata (hip bones). The sacrum functions as the end of the spine and the back of the pelvis. The center of gravity in the body is located in front of the sacrum, in the pelvic bowl.

We have a less stable pelvis than animals that locomote on four legs because of the way the weight of the pelvis balances on the legs. “The spine must sit on the sacrum behind the point where the pelvis sits on the legs so that weight now transfers through it and forward, as well as down to the legs.  Thus the pelvis can still be centered over the legs and yet provide the base for a vertical spine,” but we need to fine-tune our alignment for maximum balance while we move.


The posterior arch of the pelvis

As we can see in cathedrals, an arch can hold up a lot of weight.  The pelvis forms an arch, with the hip bones as the pillars, leaning towards each other.  These are balanced on the femurs, with the hip bones rotating on and around the heads of the femurs. The sacrum is the keystone at the top of the arch.  The keystone is wider on top than on bottom, preventing it from falling out of place; the sacrum is triangular, with the wide end up. This arch transfers the weight of the upper body, through the legs and to the ground.


The anterior arch of the pelvis

The front of the pelvis needs to counterbalance that thrust of the spine through to the floor because, as we move, the spine, pelvis and legs move; this is not a fused system. On the front of the pelvis, the cartilage that joins the pelvic bones together, the pubic symphysis, creates the keystone for the anterior arch.  The pillars are the two pelvic bones again, but the front sections (look at that picture of the pelvis again).


The flying buttress

I couldn’t resist ;-)  In this case, the shape of the femoral bone/hip joint creates an upward and inward pressure on the pelvic girdle. Much like the shape of flying buttresses on cathedrals, this functions to brace the pelvic arch. The heads of the femurs pushing up and in counterbalances the downward and outward push of the spine on the sacral joints.


See-saw: pelvic balancing act

Since we have to move this delicately balanced structure (try moving Notre Dame!), things get a bit more complicated at this point. Dowd points out that most of the weight on this structure is on the back of the pelvis, with little weight on the pubic symphysis:

This would seem to create an embarrassing situation in which the front of the pelvic seesaw would fly up and hit us in the chin unless we exerted considerable effort with the muscles that pass from the front of the thigh to the front of the pelvis in order to hold it down onto the legs. (p. 22)


Luckily, there are strong ligaments that help with this process: the ileo-femoral ligament connects across the front of the femoral joint (leg to hip connection) and does a lot of the work for us. This allows the back of the pelvis to tip up slightly, to “balance the seesaw” of forces.


Fixing our old habits

Dowd’s assertion that “few of us, however, have found this state in which our pelvis balances on top of our legs and under our spine with only minimal muscular exertion” (p. 22) will be vocally agreed upon by most of my students! Most of us have spent a lot of time trying to “stand up straight” and “tuck it under” and “pull it in” until we’ve taught our body a whole bunch of inefficient ways to balance and move. Dowd mentions how relieved she felt when she started to learn correct alignment: “. . . it was certainly a relief to know that my inability to flatten my spine against a wall while standing with ‘good posture’ was not due to deformity” (p. 23), but to the fact that the spine has three separate curves that counter-balance each other.

The spine just doesn’t work right in a straight line! If you distort any of the three curves in the back, it forces your body to work overtime just to remain balanced while standing and moving.

If you tuck your pelvis forward to forcibly straighten your back, your hips are too far forward for easy balance. You create extra tension in the muscles of the front of the thighs and back of the calves. You also tense your buttocks more and tighten the muscles in the lower thoracic spine (above your hips). That’s a lot of extra work that gets in the way of ease of movement (or tango).

If you rotate your hips too far back, your lower back and the back of your neck take the extra pressure.  In either case, all that extra work does not make movement enjoyable.

Dowd notes: “Remember how your tower of building blocks in nursery school collapsed in a heap when you did not center the blocks directly over each other? This same principle applies to our body.” (p. 24)

If your bones are not stacked up correctly, you need to use a lot of muscle work to stay upright. This makes some muscles work all the time, becoming strong, but not flexible. Other muscles aren’t used enough, becoming too weak to function correctly.

Exercises for finding the right alignment

If it’s hard for you to find the right alignment, Dowd suggests that you rest with your back on a rug or towel (if the floor feels too hard for you), knees up and feet flat on the floor. Make sure your feet are placed so that your hip joints are still in comfortable alignment. Have about a 90 degree angle between your thighs and shins. Rest your arms either 1. above your head on the floor; 2. palms down at your sides; or 3. on your chest or abdomen: pick the easiest of the three positions for you.


  • Visualize the long, stretchy length of your spine. Remember that it has three curves in it: cervical (neck), thoracic (chest) and lumbar (lower back).
  • Imagine your sacrum moving down towards your feet and spreading out.
  • Let the floor support you.
  • Visualize your lumbar spine relaxing, letting a line of energy come from the center of your pelvis/center of gravity, up along the inside of your lumbar spine.
  • Feel how the heads of the femurs can sink deeply into the hip sockets, closer to your center of gravity inside your pelvis.
  • Remember how this feels when you stand up: you are aiming for this ease of alignment when standing!
  • Your deep core muscles do the work of this alignment: if you feel your abdominals on the surface working hard, you are using the wrong muscles. This entire work of alignment is about LESS effort for more balance and LESS discomfort for more mobility.


Feel the difference: memorize the difference

When you get up, get up slowly and stand with your eyes closed for a moment, feeling the alignment again in balance, as it was on the floor. All my dance perfectionists:  Here is what Dowd says about new body postures:

Stand quietly with eyes closed for a moment and be aware of how your body feels now without making any postural adjustments or self judgements [sic].  Sometimes we feel out of balance when we alter some of our habitual patterns of muscle activity, but our sensations can be deceptive. Ask a friend or look in a mirror and see if you are actually more or less centered than before. (p. 27)


 My favorite bodyworker in Eugene, Joe, told me it takes six weeks minimum for a new habit to begin to feel natural. Stick with it, dancers!


"Visualizing Movement Potential" for tango

I'd like to summarize and expand upon another of Irene Dowd's fabulous articles in Taking Root to Fly. Rereading them all these years after my Movement Fundamentals class (thanks Sherrie Barr, my teacher!), I realize how much these ideas have become the basis of my teaching. Irene Dowd credits HER teacher, Dr. Lulu Sweigard with much of the content of this article, so read her work, too!

Her main idea in this article: the nervous system runs all the systems of the human body. Therefore, if we want to change how we move, we need to change the way our nerves and brain interact with the rest of the body: our neurological pathways. We can change these pathways through conscious attention, by changing our movement habits. 

"Dis-ease" or lack of ease, comes from the body being out of balance. The more the muscles are balanced around a joint, the less stress is put on the body to use and maintain that joint. The more the systems of the body are in balance, the easier it is to move in an efficient and pain-free way. Balance does not mean that the body is at rest, but rather that all muscles and systems have moments of rest and moments of movement, so that no part of the body is being constantly used (or constantly relaxed) and thus becoming fatigued, injured, or too weak to use correctly.

Dr. Sweigard taught correct use of the body through VISUALIZING lines of movement through the body in order to repattern how the body used energy.  She used the "constructive rest position" (lying on the floor, with the feet flat on the floor, knees up, hips/back relaxed, and arms out and up, relaxed against the floor. After the person visualized the movement in this position, she gradually transitioned them to visualizing the movement while standing and then moving around:

"Visualizing a line of movement thorugh the body while not moving can change the habitual patterns of messages being sent from the brain through nerve pathways to the muscles. As long as this constructive new thinking pattern is activated during movement, a new pattern of muscle activity is automatically being used to decrease physical stress and maintain a more balanced alignment of skeletal parts. Over a period of time during which there is continual daily attention to new habit patterns in thinking and action, the body's shape will be transformed." (p. 2)

This is what we are doing in my classes: realigning hips, knees, ankles, feet and body for more efficient balance front-back and left-right. Then, for each movement, we are repatterning how the body moves through a step to make it efficient. Each combination of muscles and joints works in balance with the body. Efficiency removes pain and imbalance. If you are in pain, the first step is to alleviate pain through teaching the body and neural pathways a new way of moving.

If something isn't working, don't just continue to repeat that step: "Not even a worm will persist after repeated negative reinforcement. The solution is to go one step back to something you can do, crawling perhaps." That may mean that you have to learn to stand and walk before learning tango. Master the fundamentals before going on so that you experience success. When you can do a movement, or series of movements, correctly, then the neural pathways have learned that and are ready to do more complex repatterning.

Exercise, part I (on the floor in constructive rest position)

  • Lie on the floor in constructive rest position.
  • Relax your body, either through visualization (sand or water or ? flowing out of your eyes, ears, hands, toes, wherever you have tension, until the body feels relaxed, open and receptive) or by tensing and then releasing each set of muscles until your body feels relaxed throughout.
  • Take time to really bring your body to neutral: this relaxation may take quite some time if you are under stress or have chronic pain in your body. If you do not feel receptive and relaxed, you will not be able to visualize new patterns easily.
  • First, visualize the basic, fundamental parts of the new movement. For example, if you want to make arm or leg movements that require your center and spine to support them, visualize a long, stable spine, and then do small or easy movements with the limb you want to use.
  • Relax again, while you continue to visualize the flow of strength and stability in your spine, lengthening without working your muscles.
  • Now visualize the entire movement you want to do, without moving your body. Imagine the sweep of the energy through your body, through each joint that is needed, through the muscles that will be used. Imagine doing it without pain or difficulty. While you are doing this, your new neural pathways are being created.
  • Any time you feel the old pattern (or pain or tightness), go back to the relax/go to neutral phase and start over. If you keep trying while it hurts or while you are clenching your body, the new pathways are NOT being formed.
  • Only spend 5-10 minutes doing this at a time: staying in one position for a long time is not good for the body: it contracts some muscles constantly, and lets others relax constantly: what we are trying to avoid ;-)

Exercise, part II (warming up, standing)

  • Get up off the floor slowly.
  • Start doing small movements to warm up the body: leg joints, arm joints, spine, neck, etc.
  • When you feel warmed up, move around doing movements you already know, letting your body feel the "rightness" of these motions.
  • Only at this point should you try the movement.

Exercise, part III (doing the new motion)

  • Do the new movement, focusing on the small, basic parts of the movement first.
  • When you do it correctly, no matter how small a part of the movement is right, congratulate yourself! Give yourself positive encouragement. This is an improvement, even if it is small and gradual.
  • Repeat the successful movement until it feels more "natural" than "strange" (your body needs to start to feel the rightness of it to memorize it as "the right way").
  • Repeat each day: this helps you learn the right movement through it feeling right, and also helps your body develop the new neural pathways more quickly.

Exercise, part IV (let it go)

  • Your body works on neural pathways, and on integrating new information, on its own. Let it do the work!
  • Go off and do other things; let go of the new information consciously, and come back to it tomorrow.
  • Come back to it daily: if you wait too long, you undo the work you did before, and must start over.

Although a teacher can help you learn what motion is correct, and can check in with you to help you adjust the process if it is not working, most of this work is YOU. Focus on the positive: the mind and body are plastic. The human body and mind can learn to do all sorts of movements. YOUR human body can do this. If you can imagine your body doing a motion, you will eventually be able to perform that motion with your body. Irene Dowd says:

"It takes about two months of daily practice from the time you have started to think about your movement differently to the time that your muscles visibly change shape. While sixty days into the future seems like a long time to wait before a new internal balance brings tangible results, it isn't very long at all in comparison to your whole life which you have already spent developing the form you now have." (p. 6)

Off you go now! I need to do my visualizations of the perfect adorno.

Approaching tango from different angles

In my current tango teaching, I've been trying a new approach: alternating very technical, anatomy-based, high-focus work with my crazy, zen games about the flow of energy, organicity of movement, and the FUN of tango.

I have apparently been forgetting the fun aspect too much recently.  A student commented to me that my technique class made tango seem very hard.  Relax the ankle! Don't bend the knees too much! Angle your hip joint for the best balance! Breathe! Stretch the spine! Push off the floor! etc. Yes, all of this is important for beautiful technique, but no wonder some folks give up on tango!

For this coming week, I am going to play tango games. And I do mean play: tango has so much improvisatory scope that the only way to fully explore it is to turn off the analytical part of the brain for a while, and move from the body; let the brain follow along as best as it can.

For my intermediate class, we are going to look at how the flow and energy of a dance movement suggests the next step. Rather than plan an A + B + C approach to the dance, we are going to use momentum and suspension and going on/off balance, to find what move comes next: a turn? a boleo? a pause? What makes sense from the flow of the motion?

What does the music suggest? Slow, fast, pause, what? If you weren't doing tango, what would you do to this music? If you are doing tango to it, what do you see in your head (turning off the "but I don't know how to do that move" part of the brain)? What other move is like that, and may work instead? When the song is over, you should have learned something about that piece of music, as well as having dancing during it. It's not just about the beat . . .

What does the space demand? Oh no, I'm in a tight corner: what could I do? Wow, extra space in front of me: what works here? Geez, that person ALWAYS backs up in front of me: how do I protect my partner? Forget steps: what direction could I go?

What does my partner provide that adds a layer to this dance? Do I have a follower who is giving me tons of extra energy to tap into, or do I have to provide the gas for this dance? Is my leader responsive to my messing around with the dance, or do I need to just give lots of energy, but not a lot of adornos? How can I be the best partner for this person, for this dance?

For my beginners, we'll play naughty toddler again (for some students, this is new next week): the follower does whatever s/he wants to do, and the leader attempts to keep the dance moving more or less line-of-dance, without crashing into furniture or other dancers. We'll find how much energy can be funneled into the dance to make it fun, if out of control. For the leaders, we'll see how easy it is to lead a partner with a lot of energy, and how to use that energy better. For the followers, we'll find out how much energy can be used to make an active follower, and where the out-of-control line lies with each leader.

I'm still working on what else we'll do, but I think we all need a break from being so serious ;-)

Plus, Oscar and Georgina will be here!!!!! I'm kind of nervous about teaching with my teachers watching, and I'm sure they've never seen such a weird tango class, but perhaps it will spark an interesting discussion! Either way, you'll see me taking class with them all weekend, working on technique again. They always inspire me to work harder to make my dance more energized and full of joy, so BRING IT ON!

Sunday Specials #1: notes on energy, connection, milonga and tango vals

For Rachel Lidskog's and my first day of teaching together, we chose topics that we felt needed more coverage in the Portland tango community: energy, connection, milonga and vals.

Class #1: Energy and connection

Many of you in Portland have yet to experience my strange and fun games to make your tango livelier, more balanced, and more connected. We mixed these up with things that Rachel teaches. We focused on four levels of connection: self, partner, music, and entire group/room/space.

Self:

Axis drill: breathing deeply, imagine that your breath comes up from below the floor, up into your lungs, and then back down through your bones, through the floor, and pushes a large magnet away below the floor. Repeat several times. Then, imagine that every exhale sends the energy & breath up out the top of your head like a fountain or whale spout. After that, take a few breaths sending energy & breath out the top of the head AND down through the feet. Like a shower curtain rod needs the spring on each end to work, you need to have energy going out both ends to balance your axis for the dance.

Moving through space: Move on each exhale and check axis on each inhale. Find your connection to the floor and the ceiling with each step. Think of the shower curtain rod springs: they don't move much, but energy is constantly going out towards both ends; the same thing happens in your body.

Partner

Force field drill: Facing a partner, not touching, and close your eyes. Do the axis drill for several breaths. Now, let each exhale send energy through your partner and towards the wall of the room. Imagine that energy: I like thinking of electricity, but you could picture a color, water, bubbles, fire, whatever--streaming out of you and towards your partner. Take several breaths focusing on a body part, and then enlarge the "force field" of energy you are sending through your partner. I usually follow this pattern: toes; knees; hips; belly button; rib cage; shoulder blades; collar bones (or back of neck); whole body. Then, extend that rectangular force field to a cylinder around yourself, step towards your partner, and dance slow motion, BREATHING and focusing on how the force field keeps your energy towards your partner, even while moving backwards.

I am here drill: Eyes open, standing several feet apart. Say "I am HERE!" as you step vigorously in towards your partner. Stand your ground, eye to eye (or even touching). Then repeat "I am HERE!" as you move back to your original spot. Notice if you step forwards and then shrink back--the point of the exercise is to REALLY be "HERE" and present, ready to dance (Rachel, correct me if I've forgotten something here!).

Follower as the motor of the dance: In open or close embrace, the leader rotates slowly in place, powered by the follower's turn steps. The follower watches his/her right hand while turning towards that hand; focusing on pivoting the feet and hips to allow for a smooth, balanced, RRRRRRRRMMMMM of a turn. When this is really working, the leader can stand on one foot and be turned around! Before you get dizzy, reverse to the other side. The hard part: create a "reverse" embrace so that the leader's right hand is out, with the leader's left arm around the follower so that the follower can watch his/her left hand while turning that way. Leaders: try not to pull or push the follower in this drill. BTW, it's good practice for leading with the chest instead of the arms.

Naughty toddler: Anyone who has led someone who is clearing NOT following can identify with the need to feel confident about leading, no matter what is happening. Naughty toddler is a game in which the follower does ANYTHING his/her little heart desires. Just as when dealing with a real toddler, the leader's job will be easiest if s/he uses the "toddler's" energy and directs it around the dance floor, rather than trying to get the "toddler" to stop!

The second goal of Naughty Toddler to is teach followers to dance with more energy. Too much energy, and you are not following, but leading. Too little energy, and it is very difficult to move the follower anywhere. In between, there is a grey zone, where the leader can be in control, but the follower contributes energy. I find that most followers dance too close to the passive edge of that zone. Whenever I find a lively follower with tons of energy, I enjoy leading more. Even if that person is almost out of control, it is more fun than motivating a comatose dancer! Followers: find "Naughty Toddler" and then tone it down just a hair for optimum following. Leaders: look out! Here come some great dancers!

The music

We are saving the tuning into music for the next set of classes.

The group

Circle community: Rachel says this comes via Alex Krebs. We stood in a circle, touching shoulders. Then, we leaned slightly in and slightly out, feeling how the group could hold up the group. We then moved right and left, feeling how the group compensated for the movement and contributed to it (Rachel, feel free to jump in here!)

Solo-couple: Finding the flow of the entire room adds to the richness of your dance--and helps you to avoid collisions. For Solo-Couple, each person walks in any direction in the room: clockwise, counter-clockwise, straight through the middle of the group, whatever. To avoid collisions, turn in place until you can find a way to move, rather than stopping or backing up. When the teacher hollers COUPLE! grab the closest person and without stopping, move into dancing counter-clockwise in the room, with at least vaguely tango/milonga/vals steps. The point is to keep the flow of the room, tune into that, and use it to make your dance. Because you don't have time to think, as a leader, you must just allow the dance to happen. As the follower, you are in synch with the rest of the room and have a good idea of the space available, which allows you to follow more comfortably.


Energy bunnies/Energy vampires
: This is a game that helps you add to--or benefit from--the energy of the room when dancing. What we all dream of is a room of dancers that, when we walk in, we can FEEL the crackle of energy and dancing! Those are the times you can dance for hours and hardly notice fatigue. Conversely, on those nights when you are tired and you get a partner who is also low-energy, it's hard to get through a single tanda. You can give energy to a partner or to the room of dancers (or take energy) as needed. This sounds very woo-woo, but I noticed that all of you felt how much more energy was present after energy bunnies. For the game, each time we passed someone, we gave/took a little energy from that person, accompanied by very fun noises :-) After only about thirty seconds, everyone's energy level was higher, and we stopped to dance a dance, as well as to feel the result of the game. Try it when you are dancing: give energy if your partner needs it, or take some if you need it, and see how it works in "real life."

We'll continue working on drills and games during our next round on December, focusing on making the embrace work better and feel sweeter.

Class #2: Milonga lisa (smooth milonga)

We started with Jorge Nel's great follow-the-leader exercise. This consists of walking in a circle to milonga music, while imitating what the leader is doing. I focus on getting comfortable with quarter turns: walking forward and then turning towards/away from the center to do step together patterns; then either turning to face forwards, or turning the other way to face backwards; but always progressing around the room. For me, this drill helps the leaders become more comfortable with the swift pace of milonga, without being tempted to take big steps. Also, it works into a drill I learned from Tete that we did for val class (more on that below).

Side-together steps: We practiced leading those same patterns (moving into and out of side together steps) with a partner. In order to get your partner to step with you, you need to "squeeze the toothpaste" up to get their feet light enough to follow what you do, or "squeeze the toothpaste" down to put their feet on the ground if they tend to pop up (we revisited this for calecitas, see vals class below).

Corridas: Using the "squeeze toothpaste up" approach, we practiced doing quick-quick-slow traveling patterns in milonga: this brings the follower's steps in a bit so that little steps (thus quicker) are executed to aid in timing the corrida. Also, instead of trying to push two quick steps down the room, try applying as much energy as you need at the beginning of the three steps, so that the pattern naturally ends with a slow at the end of the phrase.

Vai-ven (go-come): I learned this step from Daniel Trenner ages ago, and I like to combine it with other walking patterns to make a nice, elegant milonga style. The step has 6 counts and 6 steps: for the leader, forward on the left; in place on the right and the left; back on the right; in place on the left and the right. The follower starts back, in place for two steps, forward and in place for two steps. Ballroom folks: this is NOT a hesitation step, and it doesn't rise and fall like ballroom waltzes :-)

Rotating grapevine (clockwise): This step works nicely in conjunction with the vai-ven step. It is done here in parallel system. The leader steps forward on the left, through on the right (as if going to the cross), open line-of-dance with the left; those are the first three steps. Then, that is repeated by the follower (forward, step through, side step) while the leader steps backwards (but moving line-of-dance) with the right, backwards with the left (while leading the follower through to the leader's right side), and open line-of-dance with the right (facing IN). On the next step, the leader can step forwards line-of-dance. If you do a vai-ven before and after this move, it feels nice and energized without getting swoopy.

Of course, the rotating grapevine can also be done counterclockwise, but we didn't go there--yet. And, of course, you can do this in crossed system, but that is way harder!

Energizer bunny: Although the follower's role in tango or milonga is NOT to be on autopilot, I find that it helps leaders initially if the follower steps on every beat of the music. The follower does not move around: that's the leader's job. So the follower provides the motor/battery and the leader provides the direction for the dance. We practiced doing this, using both simple walks and step together patterns, and later on after we did several more complex patterns of movements.

Know your milongas: We focused on a few Canaro milongas: No Hay Tierra Como La Mia, Mi Buenos Aires, and Milonga Brava. I find that, the more I know a song, the more I can use syncopated rhythms to play (like corridas). Also, if there are any "breaks" in the song, I know when to put in an earth-shaking pause, right on the money!

In December, we'll learn some more moves and start playing with traspie. We'll continue with getting to know Canaro's milongas, as there are tons of them and they are FUN.


Class #3: Vals Musicality & swoopy moves

For vals, we added a few new moves (or improved them) and worked on musicality.

Music games:

Bim-Bam: This game comes from Luciana Valle.

  • All the dancers are responsible for keeping an even paced, steady beat. Everyone makes a noise on the "1" count (like "Bim" or "Bam" if you are Luciana) that differs from any other noises to keep the "2" and "3" counts going; everyone steps ONLY on the "1" beat.
  • Next, the "3" beat is added in, making the rhythm feel a bit like a limp: 1 3 1 3 1 3. The dancers make a different noise on "3" to differentiate it from the "1" (i.e., Bim BAM Bim BAM etc.), stepping only on those two beats.
  • Obviously, the next version is stepping on the "1" and "2" beats, which accentuates the "1" (BIM Bam BIM Bam etc.).
  • There are two other versions, to be used sparingly: stepping on all three counts (perhaps BIM beam bom or something like that?), and pausing for various multiples of three.
  • Then, all dancers put the patterns together, moving through the space (still without a partner). The group needs to keep the "1" (BIM) beat going collectively, but can play around within that. I think of this part like learning to scat sing: bee bopp a beeddeeeddee whatever; I dance what I sing.

The Blob: I take complete responsibility for this silly game:

  • The group splits up into little blobs of four to six people. The blob is responsible for keeping a steady "1" beat, as in the Bim-Bam game. However, the small group interacts while moving through space. You can be across the room or touching; moving in dialogue or trying to move together on the same counts; running circles around your group, or sticking to the middle for safety, BUT you must be continuing the last step of Bim-Bam: getting comfortable with mixing up the rhythms.
  • Then, we move into smaller blobs of two couples and do the same. Explore keeping an eye on the rest of your group but moving further away: how does that feel/work? Now try staying really close together, but working with different parts of the rhythm than the others (12 12 12 when someone is doing 1 3 1 3). Now, try to channel them and do exactly what they are doing.
  • Last, break into couples, but still don't touch. Make it a playful conversation of rhythm, where the "follower" doesn't have to stay still or do what the leader wants.

What does the Blob teach? As a follower, I found that I had ideas about rhythm that my partner did not necessarily share. I try to use those moments as adornment, rather than by taking over the lead. If my leader pauses and I hear movement, I can do an adornment with that rhythm. If I hear "1 3" and they lead "12" I can play with the rhythm to make it work for both of us (more on this next time).

As the leader, I realize how much the music helps me make up my pattern of rhythm. Thus, the better I know a song, the better my dance fits with that song and the more my partner likes the dance.

Songs that we worked on:

  • Vibraciones del Alma (Canaro)
  • La Perfumada Flor (d'Arienzo)
  • Mascarita (Laurenz)

We'll work on more songs next time, familiarizing ourselves with tunes that are played a lot in this community. If you have a favorite vals, let us know beforehand, and we'll bring that one to work on. If you want a head start, check out the following:

  • Mariquita Mo Mires (Rodriguez)
  • Mi Romance (Tanturi)
  • Dos Corazones (DeMare)
  • Estrellita Mia (Donato)
  • Desde el alma (Pugliese and others)

Moves that are fun in vals, Part One

Calecita: The main point of a calecita is that the leader moves around the follower in a giro (turn), with the follower as the center of that circle. Calecitas can end in off-axis, leaning positions, but that is not the main idea. Little calecitas (say, 1/2 revolutions, not off-axis) are great for changing directions with little space available. They also feel WONDERFUL as a follower when used in vals as a way to get a swoopy, suspended feel at the end of a phrase. Remember to:

  • Get your follower on axis first.
  • "Squeeze the toothpaste" up to help the follower stay on balance on the support leg.
  • Keep your steps equidistant from the follower's axis in order to stay on balance. For a counterclockwise calecita, I pivot my hips so that my toes are facing the other direction, and back up around the follower. This is much easier than trying to grapevine in a perfect circle.
  • "Squeeze the toothpast" down before asking the follower to travel somewhere else.
  • The easiest version of a calecita: take a side step while leading the follower in a side step; lift, turn, release & exit.

As the follower, remember:

  • Try to arrive on axis to all steps.
  • If "lifted" do not let your heels pop up! Instead, apply active, downward pressure to maintain your balance (using the embrace as a parallel to the ground balance)
  • Do not sag against partner!
  • Upon feeling the release of the lift, be prepared to travel to a new spot.
  • During the calecita, try little adornos that don't knock you off balance: little darts, circles, etc.; or the more dangerous ones like tucking your free heel behind your balance foot.

Traveling turn: I sometimes call this the Dan Turn, as Dan from Alaska used to do these ALL the time (and very well). This traveling turn is done in parallel system, and constantly moves line of dance. Each unit of turn starts with the leader using L foot to travel forward and around the follower, with Follower’s front cross through with the right initiating second half of the turn.The key is make sure that the follower can step through to the leader's left as s/he steps forward line of dance with the right leg each time the turn rotates completely.

Leader:
For the first turn, the leader walks into the "maybe" position (starting to walk to the cross) with the right; from there on, the leader doesn't really get to that position, but focuses on keeping the dancers turning. The leader's steps: Through to the inside (R), open (L), backwards (R), backwards (L), open & turning (R), forwards and turning (L); when I get started on this turn, it feels like it has four steps: around follower, slightly backwards, follower around, slightly forwards. Hopefully, one of these versions will help you remember the step!

Follower: back (L), open (R), forward (L), through (R), open (L), back (R). The main element is the through step with the right foot. Once the turn gets going, it feels like: leader steps around, follower forward, follower through, follower turning. Like polka, I find this step super-easy, but not easy to describe! Hope this helps.

Next round (December 14th): More vals steps (turning mostly) and more musicality work.